
Heavy Gear Blitz Tournament Playtest
By: J.J. Alexander
- Mission: Incursion
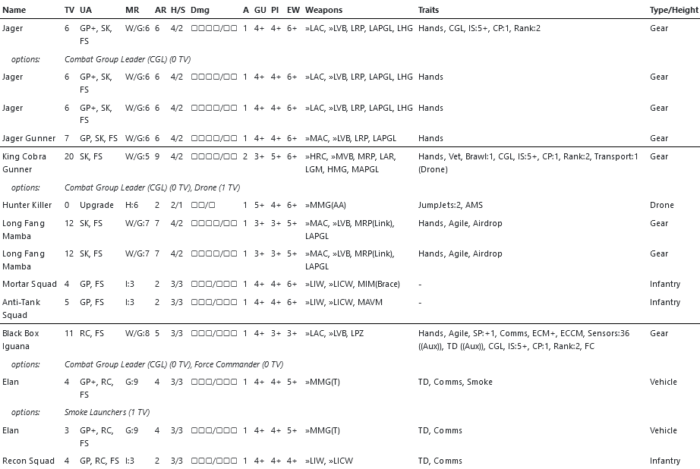
Forces

Deployment
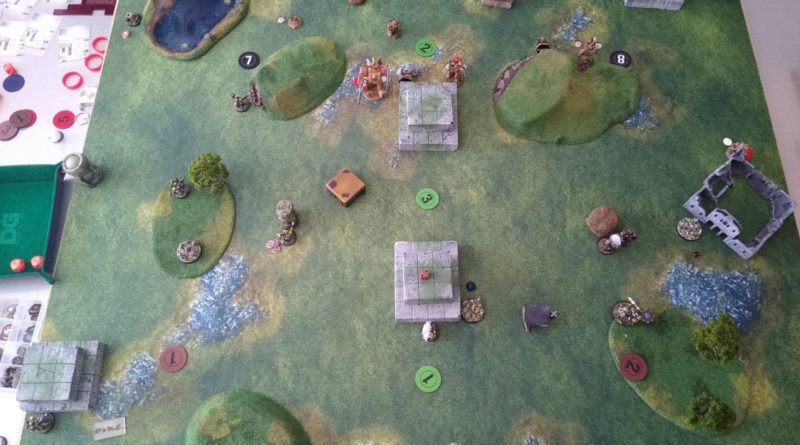
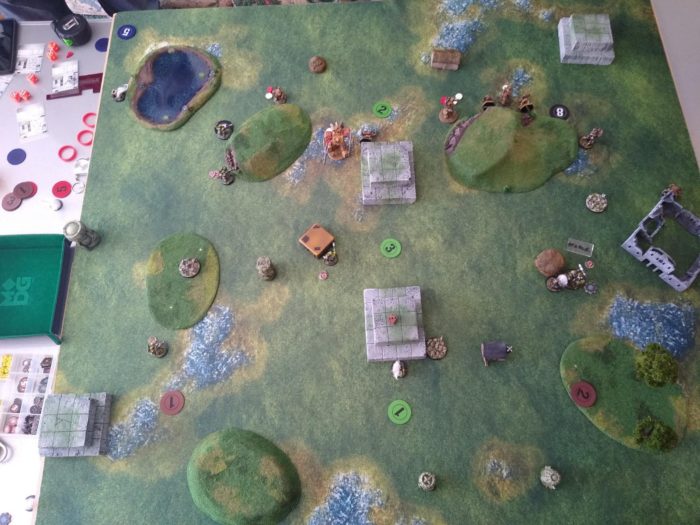
Top = North, Bottom = South, CG’s with Leaders circled
- Green: GP CG – Just getting cover, threatening left flank.
- Brown: SK CG – King Cobra in center in cover to do Fire Missions and move left or right as necessary. Yellow: RC CG – Recon Deployment, Iguana in solid cover ready to give ECM protect to whoever needs it while providing possible Jams, FO’s or Hacks if needed.
- Blue: GP CG – kill Jager leader, protect backfield, score on Hold markers, take center?
- Red: RC CG – kill Iguana, score on Hold markers, maybe take center?
My opponent deployed slightly more bunched up than I would have done, but luckily he won initiative and activated first before I could really capitalize on it.
Objectives
South:
- South
- Hold – brown markers
- Break the Line
- North:
- Hold – Black markers
- Assassinate – the Jager in the GP CG, and the Iguana.
My plan was to get the easy points on the Hold markers while scoring Break the Line with either the Elans or whatever else can get up the board. I planned on aggressively assaulting with the King Cobra and Long Fang Black Mambas, while the Jagers would slowly advance on the left and coming back if needed. The Recon Infantry would be doing FO’s while the Iguana would provide EW support. In retrospect I should have put my Mortar Infantry on my right Hold marker.
Turn 1

North won initiative and activated his RC CG on top right. He moves a Cheetah around the hill and FO’s my Iguana in the center. I try to Jam with the Iguana and fail. His FO happens and he does Fire Mission with his Scimitar and 1-2 other models – that along with a direct attack from his Jaguar manage to kill off the Iguana, thus scoring an Assassinate VP for the North. He also Overkills my Elan on the right.
The South responds by Activating the RC SG, getting a successful FO on the enemy RC CG at top right and does a LGM Fire Mission from the King Cobra and a MAVM one from the Infantry, and rockets from a Mamba on the Jaguar with secondary attacks on the nearby Cheetah. Rolls weren’t great and only did minimal damage on the Jaguar. The left Elan Hides behind the stonehead.
The North’s GP CG shifts laterally towards the middle, taking shots here and there, but not doing much. (Maybe one of them actually killed the Elan, I don’t remember).
The South’s CG of Jagers runs up the field and Hide, the one towards the middle goes out in the open and fires some rockets, but no damage. I’m just trying to put pressure on my opponent by threatening both the Break the Line scoring and his Hold markers. The Mambas and Cobra move up.
Turn 2
South won initiative again. Moves his Cheetah behind the ruins on the right, FO’s the Mamba behind the hut, then destroys it with Fire Missions, one of which was a guided anti-tank missile from the Scimitar. His Jaguar shifted left closer to his Weasel, which was a mistake, because the Weasel died from AE’s as a secondary target. His CG on the left moved more towards the middle taking some shots but not doing much damage. His Infantry Teams move towards his Hold marker on left.
My SK CG went, got the Let Them Have It order. The Mortar Squad (love the mortar inf. – they do a lot of work…) puts damage on the Cheetah behind the ruins on right. Mamba moves up and fires rockets at the Jaguar putting damage on the Weasel nearby. Cobra shifts right, in line with the black Hold marker on right, also fired something at the Jaguar on the right and the Grizzly in the center near green marker 2. AT infantry do a point of damage on the Scimitar.
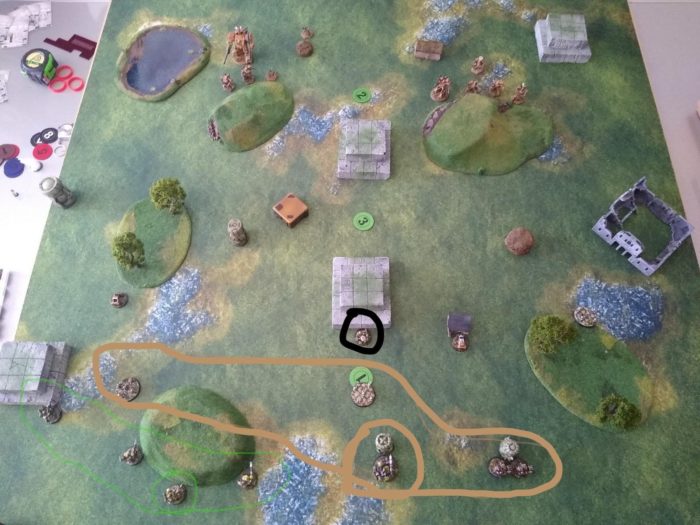
Elan on left moves up left flank and scores one VP for Line Break, also fires MMG at the infantry team on marker 7, crippling it (a Jager later finishes it off with an APGL)

Jager leader on bottom hides behind the stone blocks bottom left, trying to deny assassinate VP. The other Jagers got Let’em Have It and moved up, taking some shots and further threatening enemy Hold marker on left and Incursion marker in center. (Let Them Have It is SO good…) I think the Cheetah near the Scimitar died to AE proximity damage.
Turn 3
North wins initiative AGAIN. Moves a Hunter to the left and takes out the Elan. Scimitar puts 3 damage on Jager near black marker 7 (left), misses it’s other shot. Other Hunter moves right to reinforce marker 8. The Grizzly shifts right and puts 3 damage on the Mamba.
South Jager CGL comes out of hiding on bottom left and baby sits the hold Marker. I decided that with all the pressure in his backfield this would force my opponent in to the tough position of not having enough resources to defend everything at once since he probably can’t get his Hold VP’s and the Assassinate VP. Even if he killed the Jager CGL I was banking on still having more VP’s at the end.
Other Jager moves up on to marker 7, and the damaged Jager put damage on the Hunter nearby.
I kept putting Let’em Have It on both the SK and GP groups. Recon infantry FO’d something and I think the Jager CGL actually did a Fire Mission for zero damage. The Mamba moves towards the Gear graveyard near marker 8 and destroys the Jaguar there – I should have moved the Mamba further up to score the Line Breaker VP on this turn – my mistake.
Cobra moves up to the circular hut, threatening marker 8, kills the Cheetah with a HRC and puts damage on the Grizzly near marker 2 I think.
AT Infantry puts another point of damage on the Scimitar.
Turn 4
I finally won Initiative. The Cobra kills the Hunter with an HRC shot, and either the Cobra or Mamba finishes off the Grizzly, ending any chance of scoring on 8.
AT Infantry may have missed on the Scimitar.

The Scimitar went after the Jager CGL and missed. The Hunter Crippled the Jager on marker 7.
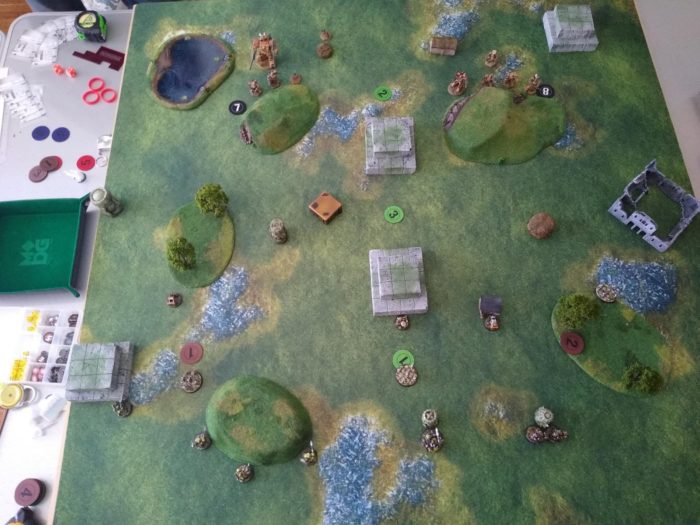
So I was able to take the back and middle Incursion markers as well as my Hold marker on left, while denying my opponent both his Hold markers.
Final Score
South = 5 VP’s. (Break the Line = 2, Hold marker = 1, Incursion markers = 2)
North = 2 VP’s. (Assassinate = 1, Incursion marker = 1)
Final TV remaining:
North = 71TV
South = 34TV
Post Game Thoughts
- Let Them Have it is incredibly efficient. I wonder if it should only apply to models in formation or something. Or maybe cap it at 3 models.
- The way Blast works was a bit odd in some cases where secondary targets still got cover because the primary target was fired on directly instead of indirectly.
- We both agreed that the Incursion markers encouraged more forward movement. There’s definite pressure to take the middle, whereas normally you might hang back more.
- With the Objectives we chose, this game felt comfortable. I don’t know if it would feel a bit hectic if more markers were on the field, like 4 Hold markers in the same area as the Incursion marker on a 4×4 table. So at this size I wonder if it’s better to rule that an Objective can only be chosen once – since there’s only 2 Objectives per player I would think it would be OK.
- There should maybe be some more rules about terrain placement and Initiative. Maybe choosing side and who activates first should be part of the initial Initiative roll-off. So whoever wins the start of game Initiative roll can choose either who activates first or which side to deploy on. This is to mitigate first activation alpha strike. Subsequent Initiative rolls would be as normal.
- So if terrain is set up better on one side, with more hiding places, then one player can take that side knowing that the other playing activating first has less of a chance of killing things before they get a chance to do something. Or if a player chooses to activate first, then the other player can take the side with more hiding places, for example. (explained for non Infinity players :P)
- In this game I lost an Iguana and a Black Mamba before they got to activate. Granted, the Iguana did a Jam Reaction, and the Mamba did a Retaliate before they died, but Reactions are often not as good as being able to dictate when, how and where you take actions during your own activation.
- Infantry are VERY tar-pit-y, maybe too much so. We both agreed that AE and Blast weapons should do more damage to Infantry, maybe half damage rounded up. Or maybe max 4 damage instead of 2. So you still couldn’t one-shot an Infantry model, but at least you can possibly cripple it.
- I really like the Hunter Killer Drone. In this game it just took a couple pot shots, but an extra action and Burst 2 along with re-rolls vs. indirect attacks is awesome for 1TV. I’m considering taking max Drones in every CG in the future…
- Overall the Incursion mission seems to be an improvement. The markers in back ensure that there’s incentive to move towards your opponents half of the table even if there’s no Hold or Capture markers there, and the marker in the middle encourages forward movement no matter what.
- I’m also working on a tourny variant that doesn’t add any new ways to score, but just modifies how the current Objectives work, like making Capture markers score-able on every turn (with a cap of 3-4 VP’s), and making Scan or Assassinate worth more VP’s, for example.
- on turn 2 I had an Elan go Top Speed and get in to the enemy DZ, scoring a Line Breaker VP. I had a Black Mamba on the right do the same the next turn. If in either case there was a window of opportunity for Reactions after the first half of the move, things may have been different and maybe I wouldn’t have scored those points. Being able to zoom past everything with no interaction felt a little abusive.
- I think it would be cool if Top Speed was broken up in to 2 moves (MR twice) and have an opportunity for enemy Reactions at the end of the first move, assuming no Actions are declared during that first move.
- Currently as written, Top Speed functions as one giant move and this could be abused by declaring actions at the very end point of the move, or even worse by declaring Hide in which case no Reactions may be possible at all depending on terrain and cover.